


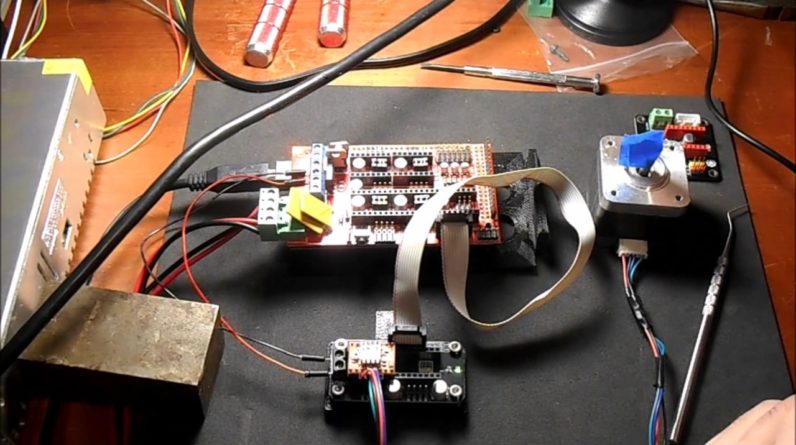
Okay, I'm gonna show you how to add a third extruder, but I want to show you a couple quick things quick first this is a stepper board buy made by Yur Bot it allows you to do your toggling of the MS. One two and three right here, and then you have your pins to line up with your auxilary so What I'm going to actually use is this one that allows you to do two And it's really simple So let me review some pins real quick here We have auxilary two that we're gonna use and the pins are as follow This one right here is the ground pin This is 5 volts pin This is digital pin 59 this is digital pin 63 This is digital pin 40.
This is digital pin 64 This is digital pin 44. This is digital pin 42 This is digital pin 65 and this is digital pin 66 then on the board We have digital pins for extruder 1 and 2 What we have here is It's hard to read but We have got our 5 volts we then have our Directory pin then we have our stepper pin then we have our Enable pin, and then we have no change pin then 4 X 2 or extruder 2 we have ground we then have Directory again step again, then we have enable and then we have no change So to hook this up. It's kind of simple to do Watch the red strip on this Basically plug it into your Auxilary two Take the other end And plug it in the same Now there is a difference with the potentiometer on the A4988 You are actually gonna have in the other direction on this particular board and it's going to point Down like it would be on a normal step except.
It's over here and your power is here Whereas on this board it would be the other direction? so the next thing we want to do is add a Stepper Motor wire and then before we actually power everything up, so we make sure we're not going to destroy anything We're going to plug in the USB into the computer and see if they get a green light on the board Which we do, so we're gonna plug that for the moment We're then going to add First the negative cable which is right here. It's on D9 It's the third screw from the top And that's gonna go into the ground which is on this side for this one Tighten that down, then we're gonna put in the power cable. It's the plus side Check it visually and do the same over here Now once again, we're gonna plug in the USB make sure everything is okay, and then we're gonna do a power test Looks good there, so now we're gonna attach The power to the board and we're gonna throw the socket in the wall socket And appears to be everything is fine, so I'm gonna unplug this for the moment because we don't need it for programming and I'll show you how to set it up on the computer …
Okay ..within the Marlin folder open version 1.1.6 We're first gonna edit pins. This is gonna be kind of simple So we're looking for pins not pins.h, but pins_RAMPS.h because this is a 1.4 board So you open up the file Now here's where your driver pins occur so you have your steppers or your? XYZ you have your extruder one and extruder two notice how they're easier on E1 So the first thing we want to do We want to copy E1 And then we want to modify E1 to E2 Now all these References where you see E1 underscore CS Underscore pin that's Chip Select.

We are not gonna use that in any of the steppers If you're gonna comment those out Now we have to change the pins here … So the first pin is going to be pin 40 STEP for DIR it's going to be 63 And then for an ENABLE, it is going to be 42 So you're going to save that you're going to close the pins_RAMPS.h file if you have saved it You're then going to then open up Marlin.ino, so here is a solution file You're going to go to the configuration.h tab you're gonna first scroll down for boards You're going to change this the EFF, so let's send two fans Then you're going to scroll down to extruders I'm gonna change it from 1 to 3 and you are going to uncomment Single nozzle gonna hit ctrl+s, to save You're then going to compile and upload the file to your RAMPS 1.4 Okay upload is now complete so the next thing to do is go to Pronterface.
So I am going to close this Okay the first thing we are going to do is open up Pronterface.exe Inside Pronterface.exe we have no other option for an extra extruder so we go to … Settings->Options Extruder count change it to, 3, click. Okay button. to close. Reopen it Now we have the option for three extruders, we're using extruder 2 which is 0 1 2, so that would be the third one? We're gonna plug in the power supply For 12 volts Go over to the send and type, "M302 S0" Press ENTER that will change the temperature for the thermistor to.
0 so there won't be a minimum, and then we're gonna press the extrude button and see if it actually works So it looks like it worked now. Let's try reverse and see if that works So if you like my videos please press the like button and subscribe and thank you for your time.