


– [Jared] This is the Enigma machine. It looks like a typewriter but it has a very different purpose. During World War II it was
used to keep messages secret or in other words encrypted. In this video, we'll look at
why the Enigma machine exists, how it was used and then we'll
take a look at the inside to see how the mechanism works. (electricity buzzes) This video is sponsored by Brilliant, a fun and interactive way
to learn math and science. Towards the end of this video we'll take a closer look
at their website and app. While making this video
I had a lot of help from enigmamuseum.com. These guys took a part
in actual enigma machine and showed me what's on the inside, behind the panels, all the inside wiring and how each mechanical piece works.
This would have taken a
lot longer to 3D model and animate without their help. So big thanks to enigmamuseum.com and now let's get to some animation. To really understand the Enigma machine we need to understand
something called encryption. Let's use an example. Say we have two friends, Alice and Bob. Alice wants to send a message to Bob however, Alice doesn't want anyone else to be able to read this
message such as Eve. Just as an example we'll keep
the message really simple. Alice will need to scramble
the contents of the message. This is called encryption. It looks like a bunch of random letters and if Eve gets a hold of
it then she won't be able to understand it.
When the message gets to Bob he needs to unscramble the message. This is called decryption. Now he can read the original message. Alice and Bob need to agree on a way to encrypt and decrypt their messages. A real simple way to do this
is called a Caesar cipher. This involves shifting all
the letters in the message three spaces to the right in the alphabet so an H becomes a K, an E becomes an H, an L becomes an O, an L becomes another O, and an O becomes an R. Now the message looks like gibberish, A bunch of random letters. When Bob gets the message all he has to do is take each letter and
move it back three spaces.
This will give him the original message so he can read it again. Now Eve in the middle, as
long as she doesn't know how the messages were encrypted she won't be able to read any one of them. During war encryption
is extremely important. Commanding officers need to
be able to get messages out to the troops on the battlefield but they don't want the enemy to be able to understand these messages. Nowadays encryption is
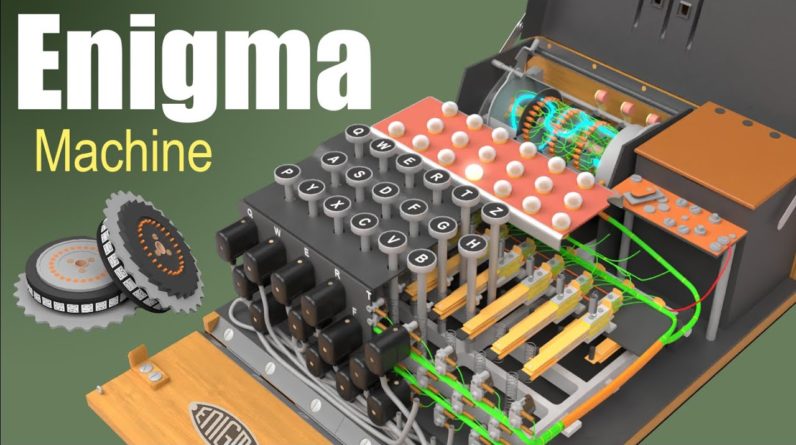
performed by computers but this wasn't always the case. The Enigma machine was used to
encrypt and decrypt messages. You can think of this
as a very sophisticated letter scrambler. It was invented in the early 1900s and then most famously, it was used by the German military in the 1930s and throughout World War II. This is the keyboard with 26 letters. And this is the lamp board
which also has 26 letters but these letters can light up. Each time you press a
letter on the keyboard, a letter on the lamp board lights up, but it will always be a different letter than the one that was pressed.
There are usually two people involved when the machine is used, one
person to type in the letters and another person to
write down the letters that appear on the lamp board. Let's use our example from earlier. Type in each letter and
write down the letters that appear on the lamp board. Now we have our encrypted message, the scrambled letters
that nobody can read. This message is sent usually
by radio using morse code. The person who receives this message also has their own Enigma machine.
To decrypt the message or unscramble it they type in the letters on the keyboard and write down which letters appear on the lamp board and out
comes the original message. The Enigma machine was used for both encryption and decryption. The person sending the
message needs a machine and the person receiving the message also needs a machine to
be able to read it again. So how does the Enigma
machine know which letters to give you? Maybe you press an A and outcomes an H. How does it do that? Well, part of the answer is electricity. Let me show you a simple example. We have a battery, some
wires, and then something that uses electricity in
this case, a light bulb.
This is called a circuit. It's a closed loop for
the electricity to flow. But if there's a break in the wire, then the light bulb turns off. If we put a switch in here,
now we can easily turn the light bulb on or off. There has to be a complete path
for the electricity to flow. Now let's add another
path, one more switch, and a light bulb.
Now we can turn on two
different light bulbs depending on which switch we turn on, there's a different
path through the wires. We could expand this even more, more switches and more light bulbs. Now, this is predictable. We know which switch
goes to which light bulb, but what if we scramble these wires? Now the switch for the letter A turns on the letter C light bulb and the C switch turns on the B light bulb. This idea of scrambling the wires, that's how the Enigma machine works. Let me show you on the real thing. The battery is inside in
the top right-hand corner of the machine. The keyboard has 26 keys. When you press one of
them it connects a circuit which will then turn on one
of these 26 light bulbs. The light bulbs will then
illuminate the letter that's directly above
it on the lamp board. When you release the key, the circuit is disconnected and the
light bulb turns off. Each key connects a different path which means a different light bulb.
Okay, this is the
challenging part of the video understanding the circuit or the path that the electricity follows
throughout the Enigma machine. Maybe pause the video, get your degree in electrical engineering
and then let's do this. The three main parts that
we need to understand are the rotors, the keyboard
mechanism, and the plugboard. Let's start up here with the rotors. This machine has three of them. This is where the letters get scrambled. Let's take a look at one of the rotors. You have the numbers one
through 26 for all the letters. So one is for A, two is
for B, three is for C and all the way around until 26 for Z. On the side you'll see
26 metal contact points. There are also 26 on the other side too. When you put two of these rotors together the metal contacts
connect, making it possible for electricity to pass through. On the inside of these three rotors you'll find lots of wires
that connects the two sides, but as you can see, it's all scrambled. So let's go through the
pin for the number one.
Follow the wire through
and it comes out the pin for the number four. So in this case an A was changed to a D. When electricity travels through one rotor it changes the letter once. But remember, we have
three of these rotors and they each have different
wirings on the inside. When electricity travels
through all three of them it changes the letter three times. Then at the end, we have the reflector. This also has 26 metal contacts.
Inside is more wiring that
connects the letters in pairs. So it goes in as one
letter and then comes out as another letter. To the right of here is the input wheel. It has 26 wires that go in and connects to the 26 metal contacts. Let's put this all together. Electricity flows through
one of the 26 wires, let's say the wire for the letter Y. Then it gets changed to a different letter at all three rotors. Then it hits the reflector,
which again, changes the letter. And then it goes back
through the rotors again which changes the letter three more times. And it comes back out on
a wire that represents a completely different letter. And if you were counting,
this means the letter was changed seven times. Now, this is just an
example of how the letters could get scrambled, but the
path can and will change. Each of these three rotors can rotate to 26 different positions. When any one of the
rotors changes positions this will also change
the path of electricity making it very difficult
to predict which letters are going to come out.
The 26 wires from the input
will travel down the right side of the machine to the
plugboard in the very front. Now the plugboard was yet another way that the letters could
be around specifically, you could swap two letters. So let's say we wanna
switch the W and the J. You could take one of these cables here with plugs at each end and put
one of them into the W spot and the other one in the J spot. On the back side of the plugboard, you can see the individual wires going to the tops of each socket,
and then out to the bottom of each socket. Let's take a closer look. This is the plugboard
socket for the letter O. If nothing is plugged into
it the electricity flows in through the top, then
through the shorting bar and then out through the bottom. This means that the plugboard
didn't change the letter. It came in as the letter
O and then it came out as the letter O.
When a plug is inserted, it
pushes up the shorting bar so it doesn't connect anymore. Now the electricity
flows in through the top, out through the top pin of the plug, then through the cable and
out through the bottom. On the other side. What came in as an O now
it comes out as an E. Often times, they would use
up to 10 of these cables. Notice how a few of these
letters are still left without a plug. Let's take a look at
the keyboard mechanism. Each of these keys is connected
to a long stem beneath it. They have springs that push them back up when you release the key. the last row of keys have the
springs connected at the top.

Right next to all of these keys most of the space is taken up. These are the 26 key switches. These switches are a
little bit more complex than just the on-off
switches that we saw earlier. Let's take a look at
just one of the switches. This one is for the letter P. The switch has three
different copper colored tabs. The wires are connected back here, and the flow of electricity is controlled from the other end. When a key is pressed it comes down and hits the rubber end of the middle tab.
What this does is changes
where the electricity can flow. Before a key is pressed the
top two tabs are connected, and after the key is pressed, the bottom two tabs are connected. There are 26 key switches
and here's all the wires that are connected to them. The top tabs are connected
to the light bulbs. The wires go to the left
and up to the corresponding 26 light bulbs. The middle tabs connect to the plugboard. They go through the wires to
the right side of the machine and down to the corresponding
letters on the plugboard.
A wire from the battery goes directly into the bottom tabs of each key switch. So each switch has three different tabs and three different places
where they are connected to. Before a key is pressed the bottom tab isn't connected to
anything so the electricity has nowhere to go. This is true for all 26 key switches. No circuit, which means all
the light bulbs are off. Now let's say we press the X key. The battery and the
plugboard are now connected. This completes a circuit
but it's not as simple as this circuit we saw earlier. Let me show you a quick overview
of the path of electricity. Don't worry if you
can't keep up quite yet, we're gonna go over each part one by one. (mellow music) Let's take a closer look at each step. Electricity flows from
the battery to the bottom and then middle tab on the
switch for the letter X.
Then it goes directly to the plugboard. And in this case there's
nothing plugged in for the letter X so it comes
back out as the letter X, up the side and into the input wheel. Then through three rotors, the reflector, and then back through the rotors again, changing letters at each step of the way. What started as the letter
X is now the letter K. Now we come back to the
plugboard for the second time. The letter K is swapped with a C. So in through the letter
K, through the cord, and then out for the letter C. Then travels from the plugboard back to the middle tab on
the letter C key switch. Remember we started as the letter X but then came back in as the letter C.
Then it goes out the wire of the top tab and up to the letter C light bulb. Then the current flows through
the metal light bulb plate to this tiny wire which
connects back to the battery. This completes our circuit. As soon as the key is
released no more circuit and the light bulb turns off. So just to recap, once a key is pressed electricity goes from the battery to whichever key switch was pressed. Then the plugboard, rotors,
then back to the plugboard, then the key switch for
our new scrambled letter, then the corresponding light bulb and then back to the battery. The letter has changed
seven times at the rotors, and then possibly two more
times at the plugboard. Remember that the letter
isn't always changed when it goes to the plugboard. Okay, the electric circuit was
the hard part of the video. If you made it this far, we're doing good, but there's a little bit
more that I wanna show you. Each time a key is pressed
you'll notice that at least one of these three rotors will turn.
Press a key rotor turns,
press a key rotor turns. This means that if you press a key twice you'll get two different letters. In fact, if you keep
pressing the same letter a different light turns on every time. This is what made Enigma so powerful. The code was always changing
so it was hard to predict which letters were going to come out. The way these rotor spin
is completely mechanical. No electricity needed for this. Even if the battery was taken out, pressing one of these keys
would still turn the rotor. On the bottom of the machine
is a large metal plate called the actuator bar. It works like a seesaw or a teeter-totter. Pressing any of the keys
pushes it down on this side, which pushes it up on the other side. Around the backside is
where the magic happens. This uses a ratchet and pawl mechanism. This is the ratchet gear. And this small piece is the pawl. When the pawl is pushed
up it spins the rotor and then comes back down. You can see how this would
spin it in only one direction.
This up and down motion will
keep spinning the rotors one slot each time. The next two rotors
work a little different. Let's take a look at the second one. Most of the time the
pawl can't make contact with the ratchet gear teeth. It's blocked by an edge around
here on the first rotor. The first rotor has a tiny
notch around the side here. When the rotor spins the
notch travels around the edge. Watch what happens when it comes up again on the other side. The pawl will fit right into the notch and the second rotor is
allowed to spin, but just once.
The next time it will be blocked again and only the first rotor
is allowed to spin. That edge on the first
rotor has to go all the way around before the second rotor
is allowed to spin again. This will happen once
every 26 key presses. The same thing with the third rotor. There's another edge on the second rotor that has to go all the way around before the third one is allowed to spin. Last but not least we
have the three levers on the very back with index
wheels at the very end. They ride along the outside
of the rotor gear teeth. This means that the rotors
always stop spinning at the next number. This is important so that
the electrical contacts always line up between the rotors. Before you use the Enigma machine, it would need to be configured
with the right settings. There are four of these
settings to go through.
First is the rotor order. Each Enigma machine came
with a set of five rotors. Choose three of them and
then choose which order to put them in. Then there's the ring
setting for each rotor which is basically the
shifting of these number wheels but that also includes
the notch on the side. This means this will change
when the leftmost rotors can be advanced to the next number. Then there's the starting
position for each rotor. You can set this to the
tiny windows up here. And the final setting is the configuration of the plugboard at the very front. So everyone in the German
army had these settings in advance. They were distributed out by paper so they would know
which settings to use on which day of the month. Even if the opposing side
has their own Enigma machine, they won't be able to read the messages unless they know the settings
that were in use that day.
Some of the ideas behind
the Enigma machine are complex and sometimes
difficult to understand. However, it may come easier to those that increase their ability
to do math and science. brilliant.org is a problem solving website and app that has over 60
courses in mathematics, science and computer science. The idea here is to learn by doing. They teach you a concept and
then immediately you get to try it out in a fun and engaging way.
You can use Brilliant to help
you as a student in school or as a professional or anyone who wants to keep their skills sharp. There's a wide range of content and they're even adding new
courses from time to time. Instead of just learning a
formula and blindly plugging in the numbers, you
get to visually see why that formula works. There's nothing quite so satisfying as when that light bulb
goes off in your brain. I like Brilliant because it shows that learning can and should be fun.
You can sign up for free by going to brilliant.org/jaredowen. Also the first 200 people will get 20% off their annual premium membership. (mellow music).