


Hello and welcome to a new video on cryptography for everybody. Today, we will have a look at AES
the Advanced Encryption Standard. AES is our standard for encryption, and it is older than 20 years now
and up to this day, no meaningful attacks have been found that reduce
the security of AES significantly. In this video,
we will discuss the basic parts of AES, the building blocks, and we will learn
how all these work together. We structured this video
into seven different parts. In the first part
we will discuss the history of the Advanced Encryption Standard
and how it was created. After that we will see a brief overview of the AES. Then we will have a look at the building
blocks, namely AddRoundKey SubBytes, ShiftRows, and MixColumns.
And finally,
we will discuss the key expansion of AES. In short, the key expansion
is not a detailed part of this video. I think we will create another video,
especially about the key expansion. The history of the Advanced Encryption Standard in January two, 1997, the US Department of Commerce
put the search for a successor algorithm of DES our data encryption
standard out to international tender, which the US National Institute
of Standards and Technology (NIST) leading the selection.
So at that time, people knew that the DES data encryption
standard was not secure enough anymore. So the need for a new encryption
standard was there. And the really incredible thing is that they put out a tender for the search
for a successor algorithm of DES. DES was more or less constructed in secret and with AES they wanted to have it
completely open to everyone and to be as transparent as possible,
and I think this is really amazing.
On April 15, 1997, following an international conference,
the final request for proposal was issued. So they designed this tender. And on that conference,
they even discussed what they really want
and what they really needed. And the winner of the tender,
which was to be defined as advanced encryption standard
or AES had to meet the following criteria at first
AES must be a symmetric block cipher. That means that the block of data
goes into the cipher, and the encryption or decryption
comes out as the same block size. So we have always block
that is encrypted and this block must use or AES must use 128 bit blocks. Then AES must be able to use 128 bit, 192 bit and 256 bit keys. So three different key sizes. AES should be equally easy
to implement in hardware and software. This was also a problem with DES,
DES was easy to implement in hardware, but it was not difficult,
but not very performant in software. AES shall have superior performance
in both hardware and software.
This is what I meant. DES was not so fast in software but fast in hardware. AES shall
have superior performance in both. AES should be able to withstand
all known methods of cryptanalysis. This is, of course, true
when we create a new cipher it should withstand all methods
of cryptanalysis. Furthermore,
it should be suitable for implementations that are secure against power
and timing attacks. These are attacks that are not a attacks
directly against a cipher, but against the implementations,
and it should be possible to make it secure against such power
and timing attacks. And especially for the use of smart cards, low resources shall be required for AES. That means the code length
and memory requirements should be small. And finally, of course, the algorithm
must be free of patent claims and it must be usable
by anyone free of charge. So that means that AES
can be used worldwide.
I think this is really nice. It was not only intended for the US market
or for the United States, it was intended to be used for everyone,
so it has to be free and usable by anyone free of charge. In July 15, 1998, the tender ended
and led to 15 proposals in total, so 15 groups of researchers and companies
and so on submitted their proposal for a new cipher
for a new standard cipher. And from August 20 to 22, 1998, on the so-called AES Conference
in Ventura, California, all proposals were analyzed and five candidates, namely MARS RC6, Rijndael, Serpent,
and Twofish fulfilled all requirements and advanced to the next round
in the AES competition. And the Rijndael algorithm
by Joan Daemen and Vincent Rijmen had proven to be very fast
in hardware and software. And indeed, this then got the new AES. And the performance of this algorithm
today is really incredible. For instance, on a AMD Ryzen 7 1800X only on a single core and using the AES-NI,
that is the assembler instruction set for the AES cipher,
this machine can encrypt using AES-128 bit galois counter
mode with three gigabytes per second.
So you can encrypt with AES today
3 gigabytes per second. I think this is really amazing. In May 2000,
all tests and public discussions on the AES conference came to an end
and as I already said on October 2nd, 2000, the Belgian algorithm Rijndael by Daemen
and Rijmen was declared the winner. And the algorithm impressed
with its simplicity, security and speed.
And up to this day, this competition the AES competition to find a new successor
of DES is considered exemplary. So finding a crypto primitive or algorithm by a competition and to make it open as it was,
was really a new thing.
And later competitions were all inspired
by this AES competition. And here
this link below is quite interesting. If you're interested in performance
of the AES, I added this to the slide. Now let's talk about AES, and at first we see here
an overview of the AES cipher and the AES cipher is not very complex,
as I have already said. It is a quite simple cipher,
more or less simple, as you will see, because we only have four different
building blocks or five when you count the key
expansion also.
So we have been a AddRoundKey
building block. We have SubBytes, ShiftRows,
MixColumns, and AddRoundKey. And here you see
the same colors. This is also the same SubBytes, ShiftRows, and AddRoundKey. So what these building blocks all do
in detail we will see on the later slides. Here you see also the key expansion. So you put in a key into the cipher
and then the key is expanded to different so-called round keys. So we have 9, 11, or 13 rounds here
in the middle and one additional round. This is based also on the key length. So with 128 bit,
we have 10 rounds, with 192 bit we have 12 rounds, and with 256
bit key size we have 14 rounds. Why do we only see 9, 11, or 13 here? We have first these 9, 11, or 13 same rounds,
and in the last last round you can see that's a MixedColumn step is missing.
That here is the final round. And the round keys
go into the AddRoundKey function. So we have the initial round key. Then we have nine round keys
that go into this loop here and we have the final or the last round
key that goes again in this AddRoundKey.
But you have always this
this four different building blocks that repeat here,
so it is a quite simple cipher, you can say. And AES itself has this what they call
– the inventors call – the state. The state is a 16 bytes array,
and usually they display the state when they put it, for instance,
into graphics like this grid here. So we have a 4×4 grid of 16
bytes. This is the internal state of AES,
and the internal state is the plain- or ciphertext. So you put in the plaintext here, the block
that has to be encrypted or decrypted. This is then the state
and the state goes through all of these building blocks
through the loop here through this building blocks
and then the ciphertext comes out. Of course, when you want to decrypt
something, you put the ciphertext here in. And then for all these building blocks,
you have inverse building blocks
that fulfill the opposite of these. So instead of substituting the bytes
with the S-Box, for instance, it would substitute then during
the decryption using the inverse S-Box.
What this means,
we will see on the next slides. So let's have a look
at the details of the building blocks. The first building block we have to
discuss is he AddRoundKey
building block, and it's quite simple. It adds one round key
to the current state array. So adding means it XOR-es the round key with the current state
and the round keys are the round keys are 16 bytes round keys
and the current state is always 16 bytes. How does this look like?
Here's an example. We have an example state here and all these
numbers here are just hexadecimal numbers.
And we took these this example from an original AES implementation
that we have in CrypTool 2. So we added a key and a plaintext and then used the implementation
in CrypTool 2 to encrypt. And this is one at AddRoundKey example. So we have this state here. It gets XOR-ed with the round key array,
and in the end we get a new state
and these bytes here are XOR-ed.
For example, the first byte of our state,
we have B8 xor 90. This is 28. This is all hexadecimal. And then we have a look at the binary
where you see that we have 1011 1000 this here is B and this is 8 here.
And then we have here xor and this 1001 is 9. And of course, 0000 for the 0. And in the end, we have 0010, this is 2 and we have 1000, this is 8 and xor just means that when we have here a 1 and here a 1,
we get a 0. And if we have a 0 and a 1 or a 1
and a 0, you get a 1 again, for instance,
we have here on this position here on this position we have a 1 here and we have a 0 here,
so we get the 1 here. This is how this XOR-ing works. So the AddRoundKey building block only XOR-es
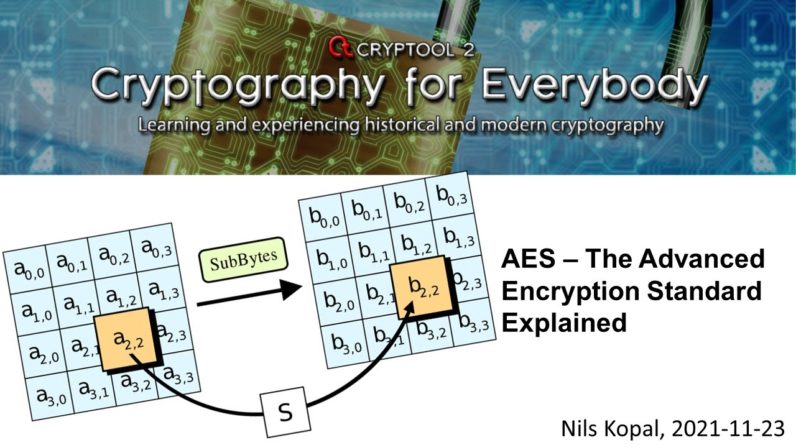
the current state with the current round key. Now, let's have a look at the SubBytes building block.
And the SubBytes building block is the substitution building block of AES.
Keep in mind that AES is still a so-called substitution
permutation network. That means it only is build of substitution building blocks and permutation
building blocks. This is a so-called SPN cipher. We already had videos about SPN ciphers
on this channel. So if you're interested in details on SPN ciphers, have a look at this video and in the SubBytes building block of AES, it substitutes each of the 16 bytes of the state
using the AES S-Box and the AES S-Box is just a huge look up table. And when you want to substitute
using the S-Box, you go byte for byte
through our current state. You look at this byte here. You search in the S-Box for that corresponding position,
for instance, here two and eight. So these are also hex values. Two and eight and the S-Box
then returns 34 and then we put the 34 here. Same for all the other bytes. And as I said, here is an example for the S-Box: one byte of the state:
S-Box(28) equals 34. By the way, when you want to actually
really learn how to… or how AES works, you should program it by yourself.
Before I created this video I implemented AES in C#.
And the English Wikipedia has a nice set of articles about AES.
For instance, here about the Rijndael.
So Rijndael is AES and has the same S-Box. And you can just go to Wikipedia
and you can program it down like this. Now you could ask yourself,
how did they create this S-Box? As someone who implements the cipher you just takes this as a look up table. Of course, the inventors of the AES
implemented the S-Box that it is secure. There are a lot of properties
that these S-Boxes in the modern ciphers have to fulfill, and they designed this S-Box that all the properties are fullfilled. Of course, these properties
are no part of this video. Maybe in one of the later videos,
I will create a video about S-Box design, but for implementation, you just need this
nice look up table to implement SubBytes. Now, let's have a look at the ShiftRows
building block of AES. And the ShiftRows building
block is one permutation in AES.
And it shifts the second,
the third, and the fourth row of the state. So here's an example how this works. You have the initial state
that goes into the ShiftRows building block
and then you can see this here. So everything in the second row is shifted one to the left here. The D8 goes out of the row, then the third row is shifted two to the left. So these 0D and 44 go out of the state and then the fourth row is shifted
three times to the left. So 1C, 3F, and 5C in
our example are shifted out and then they are
put back in the same row they came from. So we have a circular shift. So the D8 is here
now, so 0D and 44 are here, 1C, 3F, and 56 are here
in our example. So no shift in the first row,
one shift in the second, two in the third
and four in the fourth row. And this is how the permutation step
ShiftRows works. Also, a very nice part in the Wikipedia
article describes this in detail. So this is ShiftRows. Now, let's have a look at another permutation
step of a AES.
And this is,
as I think, the most complex step since it is based
on, you can say, difficult math. So in detail
they created some polynomes and then they applied
these polynomes on the columns. And there's a lot of math in behind that. But then you go through the math, in the end, you get this nice matrix multiplication here of a single column. So what does it mean? We have our state here with four
you could say vectors you interpret all these – are not rows
but columns – as vectors.
And then you apply this matrix here and then you get these new values here. For example,
you have a look at this vector here (34, 0D, 60, 5A). Do you apply this matrix here:
matrix multiplication with a single column. With this b-column here. And then you get this column. So you get this column here. You do the same for the second column.
So this vector here becomes this one here. This one here becomes this one here,
and this one here becomes this one here. The nice thing with this matrix
multiplication of a single column is that they also created an inverse matrix
so that you can multiply the result with the inverse matrix
and you come from this state to the old state. Of course, this is needed for decryption. And in detail, it means that each column
is multiplied with an invertible matrix in Rijndaels Galois field.
This is not part of this video. This is what I mean with complicated math, but for implementing AES,
you do not need to understand how this again, Galois field multiplication
multiplication works because you can create four nice equations
out of this matrix here. So you see, for instance, we have 2 3 1 1. So you have d0 here equals this galois multiplication of b0. And we have hear the 2. So this is a 2 here. Plus and the plus in our case is XOR the galois multiplication three of b1
that is here. This is GaloisMult3(b1). So GalosMult3(b1), then b2 is only 1. So we don't need any look up here. There's these are look ups. What this means are I will describe later
and we have a 1 again and we have b3 again. So we have three of four values here and the values are multiplied with this. There you see in the matrix
and this Galois multiplication methods here or look ups, these can be pre
computed as look up tables. So when you, for instance,
want to implement AES on your on, you can just have a look
at the Wikipedia site about Rijndael, the mixed columns
and there you get also the look up table.
So this is really nice. So to implement the MixColumn step,
you only have to implement these four equations here. And then you get the mixed columns
from this state as a step that you can come from
this state to this new state. And of course, there are also
four equations for the inverse method so that you can come from the new state
to the old state. So this… The design of
this is very complex, but to understand it the only or to implement it,
you only need these four equations here to implement this on these columns and
you have implemented the MixColumn step and the MixColumn step is another way
to permute the state here. So we have the substitution step
and then these two permutation steps. Now we have the key expansion of a AES,
and the key expansion means that the key is expanded to 11 for AES-128, to 13 for AES-192, or to 15 for AES-256 round keys.

Why do we need 11, 13, and 15? We have ten rounds, but an additional adding of a round key to the internal state, so we need one more round key
as we have rounds. So the key is expanded to these round keys and this key expansion
is an algorithm by its own. And therefore I did not put it
or do not put it into this video here. I think I will create a special video about the key expansion of AES
in a later video. Therefore,
the details are not part of this video. If you want to implement, for instance,
the AES key schedule on your own, how you get these round keys
from the key that you put into a AES, you may have a look
at the nice Wikipedia article for that. Now that we saw
all the building blocks of AES and how AES works or the overview of AES and how it works,
we have three tasks.
The first task is that
I first want to encrypt and decrypt using the AES cipher in CrypTool 2. So let's encrypt a text for instance, with AES.
Then, I want to have a look with you at the AES visualization
component in CrypTool 2. So this component is really helpful
if you want to implement AES on your own and you want to see the different intermediate values,
for instance, of the internal state. And finally,
I want to also show you the visualizations of AES that we have in CrypTool-Online
in the browser. I think these are it's very helpful
and really nice, and we will have a brief look also at these. So at first, let's go to CrypTool 2
and encrypt with AES. I'm here now in the current nightly
build of CrypTool 2. And as I said, the first thing we want to do
is we want to encrypt using the AES cipher.
And this is quite easy. You have the template section here
and you just search for AES, for instance,
and then we use "AES cipher with text input". Here we have a nice template where you can enter text,
then you can enter the key here. I hope this is not… That I am not in
the way right now, so I put the key here. I remove this one. So you have the key here. I think I changed the font to "Courier new". Make it a little bigger. So this is a 128 bit AES key. And here we have the plaintext. The plaintext,
of course is ASCII encoded and so we have to convert the plaintext
to binary data. That the AES component
in CrypTool 2 understands this.
This component then will return here
or output also binary data. And to visualize the binary data,
I use the StringEncoder component it and convert it to a hexadecimal value
or hexadecimal values. Yeah. So let's press "play". And I also don't like this visualization here. Let's remove the font. And let's do the same here. So we have here "The quick brown
fox jumps over the lazy dog". And here we have AES-encrypted values or as a visualization of these,
or a representation of these as hex values.
And this here is now our ciphertext. We can copy this. And when we want to decrypt that,
we post it here. We have to change our input format
to hexadecimal and our output format to text and ASCII. And we have to change the AES to "decrypt" and press "play". And then we get back our "The quick brown
fox jumps over the lazy dog".
And of course, as with all modern ciphers,
when we change a bit here in our ciphertext, this block is broken then. But the further
or the following blocks can be decrypted. But of course, when we have the wrong key,
for instance, let's change a bit. Yeah, let's change this to 1, then the AES… let's first stop it that you can see that
nothing comes out of the AES. Then it tells us "the padding is invalid". That means it could decrypt this. But what comes out
here is just random garbage.
And when we change this, I think to ECB,
we will also see… No we have to remove the padding here. We will see that, yeah,
it can decrypt the text. But the result, of course, is no, it's not the correct plaintext. And this is how you can use AES
for instance in CrypTool 2 to encrypt
text and decrypt then the ciphertext. And now let's have a look at the AES
visualization in CrypTool 2. Because we have
a really nice AES visualization component that is the "AES
Visualization" component. And we can increase the size. And when we press "play" here,
we have a hexadecimal formatted AES and we have the plaintext
that goes into this component. And I will just change this to "full screen", and you can step through the presentation
here.
It will tell you here we have the same
visualization as in my slides. We have the start, then we have the key expansion
and the first step is AddRoundKey. Then we have 9, 11, or 13 rounds: SubBytes ShiftRows,
MixeColumns, and AddRoundKey. And after these 9, 11, or 13 rounds, we have a final round
without the MixColumns step. Then we can have a look at the key
expansion and when I press "auto" here, it creates our first round key here. So you get the first round key, then we can click "auto" again and it goes into the next round. These are the round keys,
and then I click "skip expansion", now we go to the encryption of AES. So let's go to next: here we have at first our AddKey building block. So here we have our state matrix. This is, for instance,
our plain- or ciphertext and here below we have the key matrix. And when we press "auto", it creates our new state
– the result matrix here using XOR with the state matrix
and the key matrix. Now let's go to the next step.
The next step is the SubBytes step. That means we have our state matrix here. We have our S-Box here. And when we press
"auto" and you can… You can slow it down. It shows you the look up in the S-Box. It puts the result of the S-Box
into our new result matrix and we increase
the speed of the automatic mode. Then we get our result matrix. After our SubBytes building block finished. Now we go to the next step
that is ShiftRows, and I think you can also click… through… …no, you can't. But you can
press "auto" again. I will slow the animation down
and press "auto". So we have a first shift
of one byte to the left, two bytes to the left
and three bytes to the left. Then it puts
the left shifted bytes of each row
back on the right side into our state. So we one shift to the left, two shift to the left, and
three circular shifts of bytes in the
ShiftRow step.
Then we go to the next step
and the next step is the MixColumn step. This is the matrix multiplication using look ups. So you have the multiplication matrix
here on the left, you have the state matrix here
and you have the result matrix here. And when you press "auto", it takes the first column. It multiplies everything with the The Matrix, you on the left side
and it creates the result matrix. And it does this for the second column. I increase the speed. It does it with the third column
and with the fourth column. And then we get our new state
after performing the complete MixColumns step. And then at the end of each round we have again the AddKey step. When we press auto, it again
XOR-es the current round key to our current state matrix.
And this was a first round. And then the AES visualization jumps
to or goes to the second round. We can also go to the last round
or we could go to the end. And in the end, our result matrix should be our ciphertext…
we have 39 02…. … let's have a look. It's 39 02 DC… Oh, you read it, you read these out columns-wise, you have 39 25 84 1D 02 DC 09 FE. So here you have the final ciphertext after encrypting using
AES in our AES visualization. And to be honest,
this visualization helped me to actually implement AES by myself with C#.
And it's really nice to,
for instance, enter here test and test keys and plaintext,
and then have a look at your implementation
and compare the intermediate results with the results that you implementation,
for instance, creates. And now, after
showing you how to encrypt and decrypt using AES in CrypTool 2
and our nice AES visualization in CrypTool 2, I want to furthermore show you two visualizations of AES
that you can also use. And you don't even need CrypTool 2 for that.
You can just go to CrypTool-Online, and I will link
all the implementations below this video and I will furthermore link
or add the links to the Wikipedia articles if you, for instance, want to implement
AES by yourself.
I'm here now on the
CrypTool-Online website. And on this website you can find also these two
AES implementations. You just go to "CTO", then to "CTO Overview"
and you enter here AES. And we have here the "AES
step by step" that I open in a new tab, and we have an "AES animation",
and we also have distributed AES cryptanalysis, but this is not part of this video.
So in the "AES step by step" you have also a visualization of AES,
as you can see here. You can configure, for instance,
how many rounds you want to have, which version of AES
you want to have you have. I think you could change this. AES variants… ah yes here: number of rounds. When I go to "routine", it goes to "Rindael". OK. No,
you change the configuration here below. You can change the number of rounds. You can see the S-Box, the permutation,
and so on and so forth. Then you can enter a key and you can enter the plaintext.
The input here, that is the input (plaintext). And then you can have a look
at each intermediate value in each round. And you can also disable steps of AES…
so you can configure AES, as you like. And in the end, I think you can see here the final value here. So you have here
the final ciphertext and then you get it also decrypts the same. And in the end, you should see
the same plaintext as we had at the beginning. So we have some 0s… 1 0 1, let's have look some zeros 101 and in the end it says we have an F. 7F… so this "AES step by step" as the name suggests, allows you
to step through each step of the AES. And you can see it all on this page here. And I also use this to compare
my C# implementation that I created for this video
with this implementation. So I compared the values and checked if
my implementation was correct. Now let's have a look at the "AES animation", and this is the newest implementation in CrypTool 2…
Erm in…
CrypTool-Online about a AES. This was a Bachelor thesis,
and I think it's quite nice. So this is, you can say like a video. And it also goes through the AES cipher step by step. You can let it run automatically, or you can go step by step by yourself. And it really shows you
in an animated way, as I have shown you in CrypTool 2, but it does this in the browser. And I think it's also a really nice presentation of a AES. In a nice animated way, so you see here
also the internal structure of AES, as I have shown you in the presentation.
And you will see also, for instance, we have here the SubBytes step. Also the S-Box here, the look ups, it substitutes our internal state then we have our ShiftRows step,
which rotates first by one, then by two here
and then here it should rotate three bytes. Then we have also the MixColumns step. I think this is also a really nice visualization of AES. And finally, we have the AddRoundKey with the XOR. And then you see all the rounds…
I think, this is also really nice, and you can always pause and then you see all the values of AES
during these rounds.
I think this is really nice. So we have around one to five, rounds six to ten. And we can always pause and then compare our implementation,
for instance, with the reference implementation
here. Here we have the key schedule that is, as I said, not part of this video here. Here we have the key expansion. So the key expands looks like this,
as I said, I will create another video about that,
but it uses the SubBytes, some kind of permutation and then fills
this array here with new values. And finally, the finish page, OK, and then you can view the encryption
process was or the key schedule again. Yeah, and this is the end of this video. I wanted to show you
how AES works internally. I think that we did this with the slides.
Then I wanted to show you how you can
encrypt and decrypt using CrypTool 2 with the AES component. We did this. I showed you the AES visualization
of CrypTool 2 which is really nice to understand
AES further. And for instance, When you want to implement it on your own
it allows to compare your implementation and your internal values
with the ones of the visualization. Then I showed you the step by step
AES in CrypTool-Online on the web page. That's also quite helpful
when implementing or working with AES. And finally, I showed you
the new AES animation, which also shows all the internal states of an AES encryption
or decryption process. Yeah. And what else do I have to say? I have to say that
I think that AES is a very well-designed and very easy to implement algorithm When you put the math in the MixColumns
step aside.
And maybe I will also make a video about
the internals (maths) of the MixColumnsStep. And I didn't show you the key schedule. I think I will also create a video
about the key scheduling or key expansion of AES in the future. Yeah, and this is everything
that I wanted to show you in this video. I hope you liked it. If yes, please give a thumbs up. Also, if you did not yet, subscribe
to this channel, but you are really interested
in cryptology and want to learn more about cryptology,
then please subscribe to this channel. This really helps us to grow the channel
and to make the CrypTool project more popular. So, yeah, thank you very much for watching
and see you in the next video..